This DIY Halloween costume is perfect for any family, boys or girls, and is easy to make with your Cricut Maker.

Who loves shopping for Halloween costumes for their kids?! Not me! We have a rule in our house that we don’t allow any scary costumes or any costumes that will make the kids want to fight with each other (like superheroes or ninjas). This makes the choices a little more limited when we go shopping and honestly at my boys ages (5 and 6) with the rules we have there aren’t many choices for them. So this year I decided to make our costumes.
I wanted to create costumes that all the kids could be together and something that we wouldn’t see on every other family when we’re out trick or treating. Then one day when my boys were playing rock paper scissors a light bulb went off in my head. I could turn one of their favorite games into a costume!
DIY Rock Paper Scissors Costume

Not only did the kids LOVE this idea but my wallet loved it too! All the supplies to make these costumes will cost you less than $20 (even if you have to buy the paint), and I had almost everything I needed to make them already. I just needed to buy a new shirt for Mahle and the fabric for the paper.
I decided to go with a basic shirt with fusible fabric for the Rock costume for Mahle because at 2 she has become quite picky about what she wants to wear and I can’t go wrong with a basic shirt and jeans.

The paper costume was made with fleece and iron-on vinyl. I used Everyday Iron-On for the black and Foil Iron-On for the red (because that’s what I had).
And the scissors was the funnest to make. All it’s made out of is chipboard spray painted.
Cricut Products Used

Cricut Design Space and my Cricut Maker made making these DIY Halloween costumes SO easy! It took about 45 minutes to cut everything, about 10 minutes for the iron on and 15 minutes to paint and glue the scissors together. This is a great project for both advanced crafters and beginners and the sizes can be changed to fit anyone and everyone in the family.
I love using my Maker for projects like these with multiple materials because I can quickly and easily switch blades and it cuts everything so perfectly and precisely.
I also love all the new accessories Cricut has come out with and how much easier they made making these costumes too!
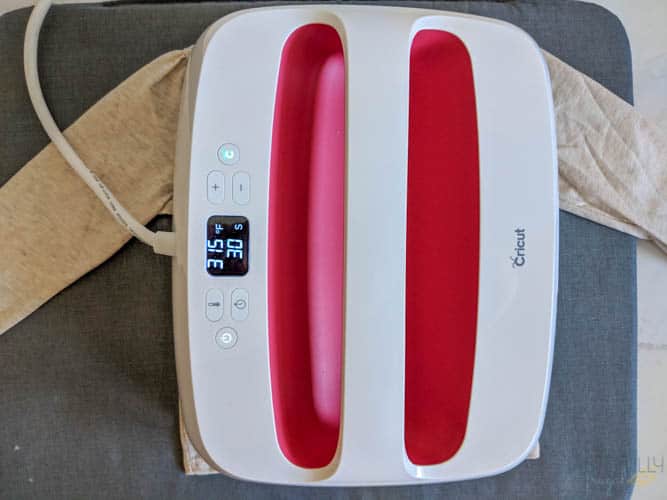
The new EasyPress 2 was great for applying the large iron-on to the fleece as well as the fusible fabric and the Heat’n’Bond.
The Double Sided Self Healing Mat was great to use for cutting the fabric down to size as well as cutting small pieces of chipboard to stabilize the scissors.
The new Cricut 18″ Ruler was great for lining up the word Rock on the shirt and for cutting the chipboard with the TrueControl Knife. And the TrueControl Knife is SO easy to use and cut through the chipboard like butter!
If you want to make these DIY Halloween costumes, you can get the design space link for FREE here and check out the tutorials below for each piece.
SUPPLIES:
ROCK-
PAPER-
1/2 yd white fleece fabric
Black Ribbon
SCISSORS-
2mm Chipboard – 4 pieces
Red and Grey Spray Paint (I like Krylon ColorMaster Paint + Primer)
Masking Tape
Glue
CRICUT MACHINES & TOOLS-
Rotary Blade – comes with Maker
StrongGrip, StandardGrip and Pink FabricGrip Cutting Mats
When ordering from Cricut.com make sure to use promo code TFRUGAL to get 10% off and score FREE shipping!
DIRECTIONS:
Open this design in Design Space and cut all materials.

ROCK-

Make sure to mirror image on mat that says ROCK and select Fusible Fabric from materials.

Make sure rotary blade is in the B Clamp.
Use brayer to roll fusible fabric flat on to Pink Fabric Grip Mat, fabric side down.
Cut design.
Preheat EasyPress 2 to 315°F and 30 seconds.

Preheat shirt for 5 seconds and line up letters using the Cricut ruler to make sure they are centered and lined up.
Use medium pressure to press for 30 seconds on the front and 15 seconds on the back.

PAPER-

Cut your fleece down to two 12″x24″ pieces. Line the fleece up on the self healing mat and use the acrylic ruler and rotary cutter to cut the pieces.

Use the brayer to smooth the fabric onto the 12″x24″ Pink Fabric Mat and select Cotton Fabric on the materials before you cut.
Make sure the rotary blade is still in the B clamp and cut the two pieces of fleece.
Change the material type to iron-on and mirror the mats that have the lines for the paper on them.
Place iron-on vinyl shiny side down on StandardGrip Mat and cut lines out.
Use weeding tool to remove excess vinyl.
Preheat EasyPress 2 to 315°F and 30 seconds (note if you turn off your EasyPress 2 after you make your shirt, it will automatically heat up to 315°F and 30 seconds when you turn it back on).

Preheat the bottom long side of one of the pieces of fleece with your EasyPress 2 and apply a small strip of Heat’n’Bond. Press for 15 seconds with your EasyPress 2 and then remove the paper backing.

Put the second piece of fleece fabric on top of the Heat’n’Bond and press for 20 seconds.
Turn your one big piece of fleece back over and preheat the top half with your EasyPress 2 for 5 seconds.

Line up your black lines and press for 30 seconds on the front and 15 seconds on the back.
Slowly peel plastic backing at an angle.
Repeat the last three steps with the bottom half of fleece.
Place your red piece of iron-on vertically down the left side of your fleece on top of the black fabric. Place the large piece of plastic backing over everything to protect the iron-on while you are pressing.
Press for 20 seconds on the front and 15 seconds on the back.
If you are using foil iron-on wait for it to completely cool (about 2 minutes) before peeling.
Repeat the last three steps with the bottom half.
Take two small pieces of Heat’n’Bond and apply at the top on the back of the top piece.
Measure the person wearing paper and cut the black ribbon down to size so it can hang comfortably from their neck.

Put black ribbon on Heat’n’Bond and press for 20 seconds.

SCISSORS-

Place 2mm Chipboard on Purple StrongGrip Cutting Mat and tape down all 4 sides with masking tape.

Select 2mm Chipboard from the materials and make sure the knife blade is in the B clamp.

Move the star wheels all the way to the right
Cut the 4 pieces of the scissors.

Paint the 2 pieces of handle with red spray paint and the blades grey. I did two coats of each color.

While paint is drying cut 2 pieces of chipboard with your True Control Knife to add stability to the scissors where you will glue them together.
Glue all four pieces together and then glue the two small pieces of chipboard on top of joints.
Place heavy books on top and let dry for 1-2 hours.
Measure the person wearing scissors and cut the black ribbon down to size so it can hang comfortably from their neck.
Staple black ribbon on back of scissors.
It took me less than 3 hours to make these costumes (including design time) and my kids all LOVE them! Does your family dress up together for Halloween? I’d love to see your costumes in the comments!
If you’d like to check out more ways you can use your Cricut check out these posts! Need help with your Cricut? Join our Cricut Support Facebook Group!

This is a sponsored conversation written by me on behalf of Cricut. The opinions and text are all mine.


Leave a Reply